We are starting a new monthly event at Sally's Fabrics. I apologize if I have talked about it before, but there has been a slight change this holiday season in regards to this boutique.
Okay here we go......
Each month we are going to have what is called a "Girls Only Night." It will be a fun evening, different most months, to provide V A R I T Y. I will always try to have some kind of "make -n- take," which I think is so fun. And of course, there will always be delicious refreshments. This Spring I want to start a new fun class called "Scrap-booking with fabric 90/10." What this will be is a scrapbook compiled with up to 90% fabric and only 10% paper. Many of the pages you won't even want to put in a binder, but frame because they are so beautiful.... Anyway, in January, I was thinking that it would be fun to actually come to our "Girls Only Night" and to make the first page - preferably for free... (That is my goal.) I want to get our customers excited about this new class.
Also at "Girls Only Night," I will TRY to always have a boutique. They items being sold are so cute. Anyway the slight change I mentioned in the beginning is this: We are leaving the boutique items from our Girls Only Night held on November 30 up through the holiday season. I have included a few pictures to tempt you into coming into the store. I have to say that each item is priced very reasonably, and would make a great handmade gift. We have many hair accessories that are PERFECT for stocking stuffers.
Please note! We only have 13 days left before Christmas. Give the gift of fabric, a gift card, or a SEWING MACHINE. YEAH!! Make it a Christmas they will never forget, and with each machine purchase, you will receive free sewing instruction, and 10% back on a gift card to use anywhere throughout the store. Our gift cards never expire.
I thought it would be great to establish a pattern of putting "How to's" on the blog. This particular towel is GREAT as a baby gift or can be made if you are having a baby yourself! (congrats...) Anyway, the first thing I did was buy a towel - regular size, and a coordinating washcloth. See the following pictures.
Now I bought the towel already sewn with flower embroidery; although, with my Pfaff embroidery machine I could have added the flowers EASILY.... I didn't have as much luck on the washcloth; so, I made sure I bought a washcloth with the same pile. Because I couldn't just have a PLAIN white washcloth, (very boring) I added a small amount of coordinating Minky.
With the wash cloth you 1.) fold one side back approximately 3-31/2" and pin. I then measured a minky scrap that fit the back 2/3rds of the washcloth and pinned in place. 2.) Next, I stitched the folded part of the washcloth in place. My stitching is where you see the pins on the white part of the washcloth. 3.) At this point you will fold your washcloth right sides together, and stitch the back side of the washcloth (1/2" seam) turning right side out when done. Your stitching line will be where the pins are placed on the pink minky (the pins going up and down) but, on the wrong side of the washcloth.
After you prepare your washcloth, you will get your towel ready. 1.) Fold your towel in half lengthwise, and place a pin marking the middle of your towel. I find it very handy to also pin the edges of your towel together so that when you are measuring your pleats, you end of with both sides of your towel being even. 2.) Starting on one side of the towel measure 5" and fold back a portion of your towel 2" to make your first pleat. To make your second pleat you will measure 3" and fold back a portion of your towel 2" to make your second pleat. Repeat last step to make your third pleat. 3.) Repeat the entire step #2 on the other side of the towel, adjusting the third pleat if necessary to make sure your sides are even. 4.) Once the pleats are in place, baste over the pleats to keep in place, and remove pins.
To attach the washcloth to the towel you are going to pin the right side of the washcloth to the right side of the towel. The back seam of the washcloth pins directly to the marked middle of the towel. Stitch through all layers. When finished, I like to hand sew a white pom pom to the top of the hoodie - making the towel even cuter.
** Now, I have to say here that I like to buy fairly plush towels - they last longer. In fact, I have two towels that my kids are still using today. They are as good as ever! When making these towels you will notice that you will be sewing through several layers of towel especially if you add minky like I did. When I use my duel feed on my Pfaff machine, (not JUST a walking foot, mind you) I never brake a needle.
Guess what? At Sally's Fabrics we have never had a Black Friday sale?? I love Black Friday so, I decided that this year we will host our first "Black Friday" event. Come into the store - we open at 7:00am. We will have sales (good ones too) from 7:00 am - 8:30am then another awesome sale from 8:30 - 10:00am. From 10:00 to 1:00pm come yet for even more discounts. If you are on our e-mail list you should have been able to print an additional coupon to use after 1:00pm. We will also have a "Black Friday" tree to get specials. AND LAST BUT NOT LEAST - WE WILL GIVE AWAY A NEW SEWING MACHINE!!
Welcome, Welcome to our first "Girls Only Night" to be held on November 30, 2010.
Girls Only Night will be a monthly event starting this November. In December we will have a "Sew-In." Wait...don't leave! I'll explain each in a few short sentences. Girls Only Night - November - Come enjoy refreshments catered in part by Sweet Cakes, (Yummy!!) and take part in demonstrations, bundle sales, a BOUTIQUE, door prizes, and a chance to win a FREE block of the month quilt (you must be present to receive free item,) and a chance to watch, and leave with a free embroidered design (shown below.) We are so excited to see all of our LOYAL customers!
Okay, here is the deal :) Come to our "Girls Only Night," and we will embroider this design for you for free! There are just a few limitations: We have preselected a few colors of embroidery thread that will be used for that night. We have reserved the colors you see here as well as the fabric(for purchase) and pattern (for purchase.) We will also have two other selections of embroidery colors that can be stitched out that night, colors that go with two other pre-selected lines of fabric for use with this pattern.
Of course, at Sally's Fabrics we have an entire range of colors of thread that you can use in your embroidery machine. Come that night and see all of our new fabrics. And hopefully by that night we will be stocked with all of our new notions! We appreciate your patience. At Sally's Fabrics our goal is this: We want to be completely stocked with machines, fabric, and notions. We also wish to become your favorite teaching store... meaning, at Sally's Fabrics be prepared to not only find your sewing machines, fabric, and notions; but come to us to LEARN HOW TO SEW! On Saturday's, we also have our marvelous teacher, Lola, here to help you with your sewing projects. Call ahead (before Saturday, or she might not be here,) and Lola will help you with that project that "you just can't figure out." Lola is a whiz at sewing.
Okay - next....December 10th we will have our "Sew In, and a Movie" night. This night will cost you only $10.00, and that includes dinner - pizza and drink, and of course, will hold your spot! Call now, space is limited. Come and finish those Christmas projects that you want no one to see. Or, just come and enjoy as we stitch away and enjoy each others company. If that's not a good enough reason - come and meet a new friend. We look forward to seeing you for both.
Here is the project we will be making this Saturday at our FUN Kids Club. Sign up now - spots are limited!
Here are the supplies for these fun treat bags!
FOR ONE BAG:
2 - 7x7" pieces of fabric (inside lining)
2 - 4x7" pieces of fabric (outside of bag)
2 - 3x7" pieces of fabric (bottom of bag)
12" of 3/8" grosgrain ribbon
We will be making two bags so you will want to double the supplies listed above. I decided to put the supplies for ONE bag only in case students wanted each bag to be made out of different fabrics. I would recommend though that all of the fabrics for one bag coordinate.
The class will be from 10:30-2:30pm. Students will need to bring a sack lunch - and the fee will be $15.00 per student.
I hope to have a classroom FULL of kids. Sign up at Sally's Fabrics 480-833-7201 today.
ANNOUNCING - Kids Club this Saturday. We will be making two treat bags! I just wanted to give all of my faithful kids' club members a heads up to sign up!
Pictures and supply lists will be posted tomorrow. Remember club meeting time will go from 10:30-2:30 and will cost $15.00 per student. Also, bring a sack lunch - and look forward to hours of fun!
So... good news! We have recently received some new fabrics (we are more than excited!) Over the next few weeks we will be adding new fabrics and lines; but, to do so... we have to clear out the older fabrics. So at Sally's Fabrics we are marking down our older fabrics - most if not all of our older fabrics. If we've had it for more than a year, you get a discount. The longer we've had the fabric, the bigger the discount! WE HAVE GOT TO MAKE ROOM!
Hey all you kids out there ages 8 and older!! Just take a look at the photos below!!
Okay - so here are the details:
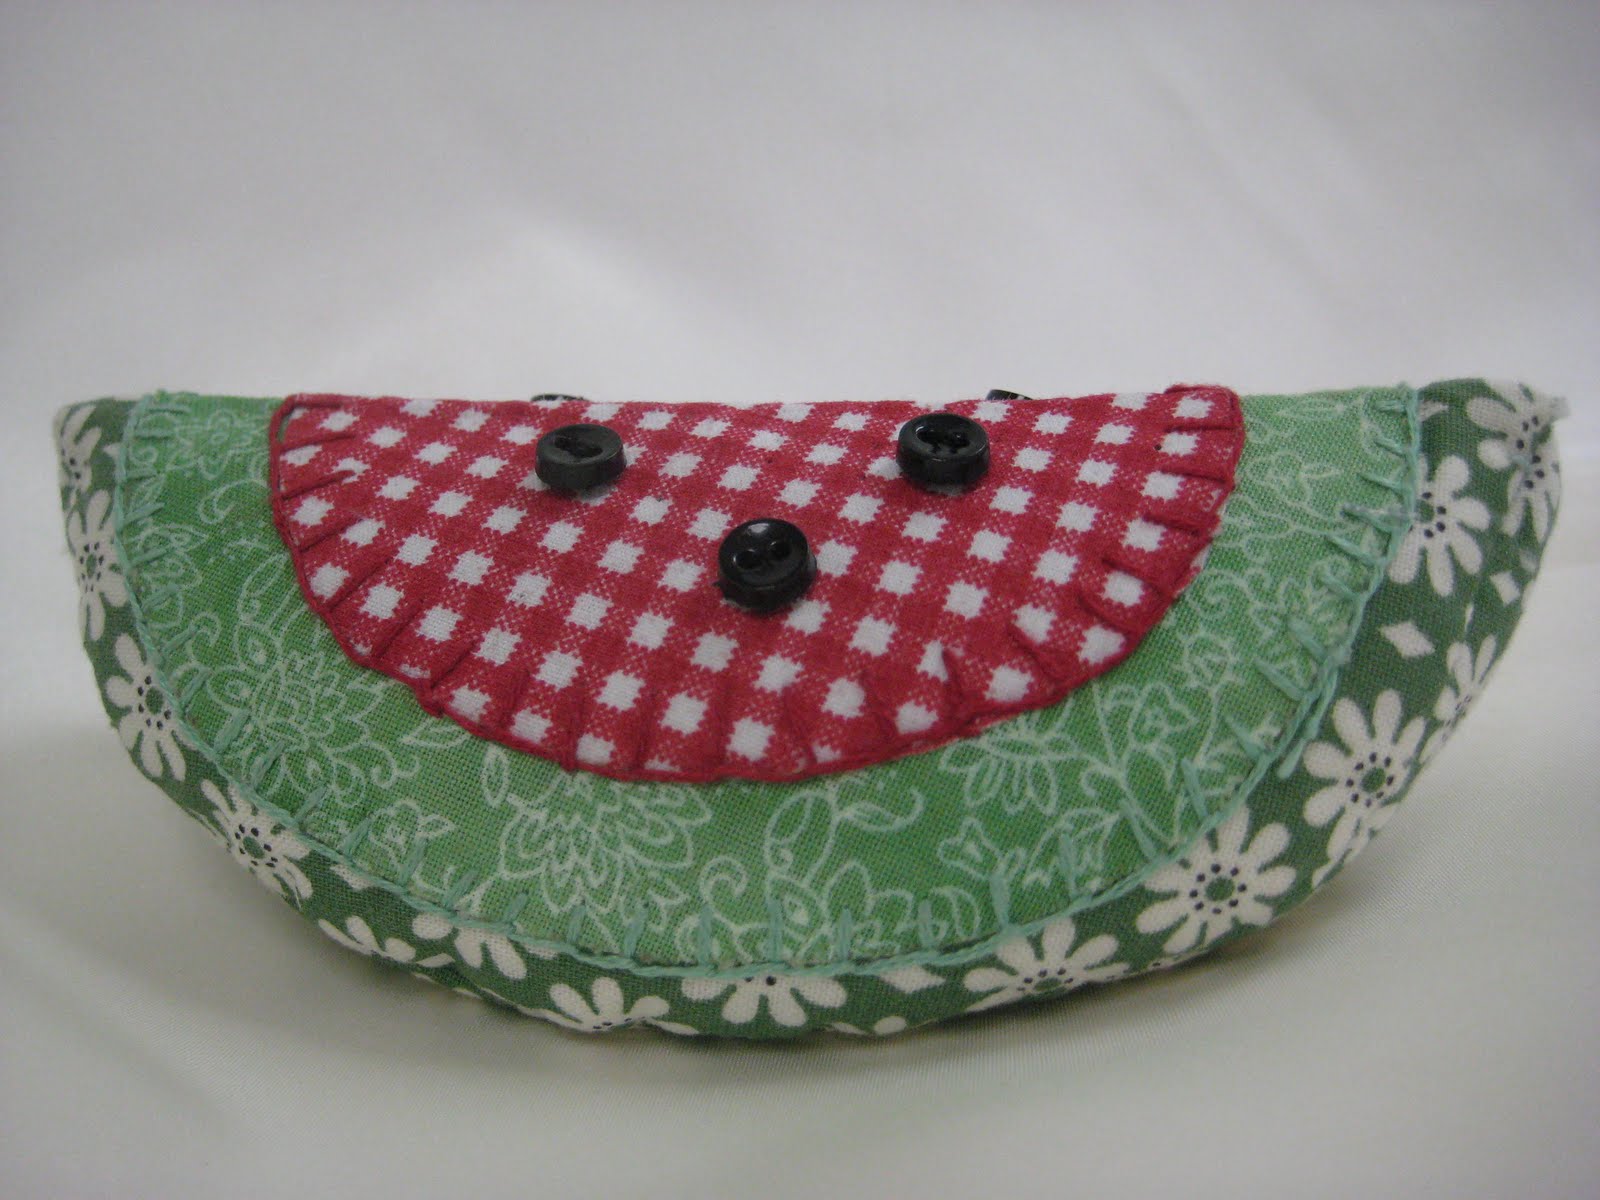
This is a pin cushion that involves very little machine stitching - it does teach new sewers how to do a blanket stitch as well as how to sew on buttons.
The pin cushion is fairly small measuring about 5" long and 4" wide in the center. Following is a list of supplies that will be needed for the class if your child is interested in signing up for a fun Saturday project.
Supplies
9" square of a green print
5" x 6" piece of a light green print
5" x 4" piece of a red print
(6) small black buttons
Medium-weight fusible interfacing
Paper-backed fusible web
1 cup of plastic filler beads or small bag of craft sand
The cost for this class is $15.00 and will be from 10:30-2:00 pm. Each child will need to bring a sack lunch. Call Sally's Fabrics at (480) 833-7201 to sign up today - class space is limited.
For all of you quilters out there this Saturday we will be having a MYSTERY QUILT class taught by our master quilter, Eileen. Class space is limited so, call the store to sign up 480-833-7201. See further information below...
FREE - Mystery Quilt Class
Saturday Sept. 11 starting at 9:30 am - Bring a sack lunch and have tons of fun! Call store for more details - will need to purchase a pattern but you can use scraps you have or swap with others there.
I was doing a little research this week on comments posted on the internet regarding Sally's Fabrics in Mesa, Arizona. I think it is healthy to see what customers think of your store. What I found was a comment that was somewhat positive and interesting. The customer LOVED our huge selection; but, at the same time, was disturbed by the higher prices of the fabrics, when compared to other fabric stores like Walmart and Joannes.
SO... I felt an explanation was in order...
I have to admit (and am embarrassed to do so!) that when I joined Sally's Fabrics five whole years ago I knew nothing about the quality of fabric... i.e. thread count, feel of the fabric etc... so, here I have sewed regularly for 20+ years and have been buying cute fabric, yes, a bargain, yes, but low quality, also yes.
So you may ask, DOES FABRIC QUALITY COUNT? And the answer is YES!
What I did to back up my opinion regarding this subject was I interviewed a lady who is a master quilter (one who is not associated with Sally's Fabrics.) I was very interested in getting a second opinion on fabric quality. And, this was her opinion: "Quilting is such a fun hobby; and, it is time consuming. But, when a project is finished WOW you have such a beautiful project. The interesting thing though is I am adamant that when doing such an important project, sewers must use high quality fabric - that is, you need to look for fabric which has a high thread count, fabric that won't bleed, and fabric that won't fall apart while you are working with it." **April Price
In fact, with any project you are working on, if you are going to go through the process of actually taking the time to sew it. (I mean SERIOUSLY we can all find cheaper pre-made projects at the store) why would anyone spend money on low budget, low quality fabric???
NOTE TO MY FOLLOWERS: Buy your fabric to last a lifetime! I mean really, what would it be like to wash lets say, your newly purchased flannel from Sally's and have it come out of the dryer not all wadded up in a ball?? Or, how about buying flannel that doesn't ball up with multiple washings? And I have to mention our minky fabrics. I have a baby receiving blanket made from Sally's Fabrics minky six years ago! And, my daughter is still carrying it around! The minky is still as soft as the day it was made. That is even hard to find in a minky blanket bought in a high priced department store!
So... I guess the message I'm trying so hard to get across is,you pay for what you get i.e. QUALITY FABRICwhen you shop at Sally's Fabrics.
Okay - Welcome to PROJECT MONDAY!! ...or TUESDAY :)
Project Monday is exactly what it sounds like--I'm going to try and introduce a new project, or at least a new "tip" each Monday. This Monday I thought I'd introduce a project for adults as well as kids being that we at Sally's Fabrics are trying to get kids sewing. I especially want those of you who think you can't quilt to listen (or read) up. I made this project - my first quilting project. Yay! Anyway, for those of you who don't know - I love to look at project magazines and books. I'm not always good at making up my own project; but, I can follow project directions. And what if I couldn't figure out the pattern you might ask? Well you could always come into the store and one of our friendly staff would be more than happy to help you out!
For this Project Monday I am introducing my new "Fast Tote." I got this pattern from Quilts and More by Better Homes and Gardens Creative Collection Spring 2010
Below you will find the directions. I pulled the directions off of the internet as a "free pattern." I found the directions very easy to follow, and was so excited with the finished project!
One more comment: For those of you who are not familiar with "Scribd" it is sooo awesome!! You can just click on the three buttons displayed at the top of the Scribd page and you can either enlarge the directions, you can download the directions, or you can print the directions. Isn't technology cool :) OR BETTER YET, YOU CAN COME INTO SALLY'S FABRICS! We have the full color directions as well as the project on display. I did want to mention that I used the Marcus Catalina line which I think is so fun.
Soo... onto our kids project like I promised!
This project was really fun, and actually really quick. It was so easy a 5th grader could do it. Ha Ha. When I was doing my school shopping for my children I noticed right away how many cute notebooks and folders that were in the store this year. So I asked myself, why go through the hassle of sewing on my notebook?? I decided not only does that make it unique; and of course, it is fun; but, I also used a "school calendar" notebook. None of those were decorated cutesy. You could also do this to a journal. Above, you will see the picture, next I will explain the directions. Note, as above, I used the Marcus Catalina line which we still carry!
This particular pattern I got out of Quilts and More by Better Homes and Gardens Creative Collection , Summer 2010
****Note: We do carry all of these fun magazines in the store. They are full of fun projects; and, I have been so impressed with the explicit directions.
Okay this project is called "take NOTE" First, the supplies,
*7 1/2 x 4 1/2" rectangle striped tone on tone (applique foundation)
*71/2 x 6" rectangle floral print (applique foundation)
*Scraps of assorted prints (unit)
*1 1/2 x 7 1/2" strip pink and gray print (band)
*6" square floral pattern with pattern centered
*Purchased 6 1/2 x 9 1/2" wire spiral-bound notebook (available at office supply stores) I bought mine at Staples!
*Glue stick, and *Spray adhesive oh... one more thing *an 8 1/2 11" piece of scrapbook paper to match your notebook.
Cut fabrics as follows:
1. From Floral 7 1/2 x 6" rectangle, cut to 7 x 4" rectangle
2. From Striped piece, cut 7 x 5 1/2" rectangle
3. From scraps cut, 1 - 2 x 2 1/4" rectangle, and 2 - 2" squares
4 From pink and gray floral cut to 1 - 1 x 7" strip
5 From 6" square cut 1 - 4 3/4" square
Assemble as follows:
1. Pry open spiral binding and remove front cover from notebook.
2. Referring to the above picture adhere floral 7 x 4" piece and 7 x 5 1/2" striped piece to notebook cover, avoiding spiral-binding holes, to make applique foundation; adhere fabrics in place with glue stick. Trim excess fabric along notebook cover edge.
3. Join short edges of assorted print 2 x 2 1/4" rectangle and 2 " squares (using 1/4" seam). MAKE SURE THE 2 X 2 1/4" RECTANGLE IS IN THE MIDDLE... i made this mistake :(. Once sewn, press seams open. With right side up, fold under long edges of unit 1/4" and press.
4. Referring to above picture, position step 3 unit onto notebook. Adhere with glue stick. Top-stitch unit to notebook cover 1/8" from long edges. To stitch through the notebook cover it is suggested to use a heavy duty needle; although, I was able to use my normal weight needle.
5. Referring to above picture, position pink and gray fabric on applique foundation to cover raw edges; adhere as before. Zigzag-stitch print to foundation along long edges. Trim any excess.
6. Turn under edges of 4 3/4" square 1/4" and press. Position square on applique foundation, adhere as before, and top-stitch 1/8" from outer edges. Trim top and right-hand corners of square even with notebook cover edges.
7. Zigzag-stitch around outer edges of cover.
8. Apply a coat of spray adhesive to back of 6 1/4" x 9 1/2 " card-stock. Adhere card-stock to reverse side of cover to conceal stitching. Reassemble notebook, bending wires back into place to complete project.
Note that if you want to use a different size notebook, feel free to do so! I did and I had to adjust my fabric pieces just slightly. I would LOVE to have you come into the store and ask me any questions! Until next time...
WELCOME!! Here at Sally's Fabrics we have had numerous questions about our ongoing Sally's Kids Can Sew program. This program, for those who are interested, involves girls and boys ages eight to ten. We are excited to teach your children how to sew, and realize that sewing usually takes more than just a few lessons.
At Sally's Kids Can Sew your children will attend a weekly sewing lesson for an hour at a time. These lessons will continue throughout the school year and will teach the "sewing basics." Sally's Kids Can Sew is actually a four year program filled with numerous projects and teaches multiple skills. In the first year your child will make 8-10 projects which include, three different shirts, pants, shorts, sleepwear, and a sewing bag just to name a few.
Prices are $45.00 dollars a month - the first month includes has an additional $35.00 fee for your child's workbook and year's worth of patterns. At Sally's we are dedicated to making sure that sewing DOES NOT become a lost art!
ANNOUNCEMENT**ANNOUNCEMENT**ANNOUNCEMENT
At Sally's Fabrics we have many sewing clubs geared towards adults. They are a lot of fun and hey, you get to meet many new ladies who share your passion for sewing! BUT, at Sally's we have gone a step further and are now forming a club just for kids. Our first meeting will be on September 11 and we will be making watermelon pin cushions. We will be meeting in the morning and ask that your child bring a sack lunch. Call the store at (480) 833-7201 and enroll your child today.