Okay - Welcome to PROJECT MONDAY!! ...or TUESDAY :)
Project Monday is exactly what it sounds like--I'm going to try and introduce a new project, or at least a new "tip" each Monday. This Monday I thought I'd introduce a project for adults as well as kids being that we at Sally's Fabrics are trying to get kids sewing. I especially want those of you who think you can't quilt to listen (or read) up. I made this project - my first quilting project. Yay! Anyway, for those of you who don't know - I love to look at project magazines and books. I'm not always good at making up my own project; but, I can follow project directions. And what if I couldn't figure out the pattern you might ask? Well you could always come into the store and one of our friendly staff would be more than happy to help you out!
For this Project Monday I am introducing my new "Fast Tote." I got this pattern from Quilts and More by Better Homes and Gardens Creative Collection Spring 2010
Below you will find the directions. I pulled the directions off of the internet as a "free pattern." I found the directions very easy to follow, and was so excited with the finished project!
Quilting Bag 08-10
One more comment: For those of you who are not familiar with "Scribd" it is sooo awesome!! You can just click on the three buttons displayed at the top of the Scribd page and you can either enlarge the directions, you can download the directions, or you can print the directions. Isn't technology cool :) OR BETTER YET, YOU CAN COME INTO SALLY'S FABRICS! We have the full color directions as well as the project on display. I did want to mention that I used the Marcus Catalina line which I think is so fun.
Soo... onto our kids project like I promised!

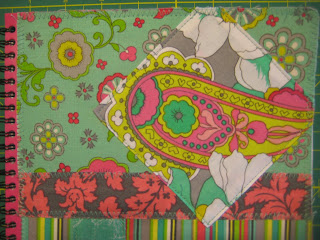
This project was really fun, and actually really quick. It was so easy a 5th grader could do it. Ha Ha. When I was doing my school shopping for my children I noticed right away how many cute notebooks and folders that were in the store this year. So I asked myself, why go through the hassle of sewing on my notebook?? I decided not only does that make it unique; and of course, it is fun; but, I also used a "school calendar" notebook. None of those were decorated cutesy. You could also do this to a journal. Above, you will see the picture, next I will explain the directions. Note, as above, I used the Marcus Catalina line which we still carry!
This particular pattern I got out of Quilts and More by Better Homes and Gardens Creative Collection , Summer 2010
****Note: We do carry all of these fun magazines in the store. They are full of fun projects; and, I have been so impressed with the explicit directions.
Okay this project is called "take NOTE" First, the supplies,
*7 1/2 x 4 1/2" rectangle striped tone on tone (applique foundation)
*71/2 x 6" rectangle floral print (applique foundation)
*Scraps of assorted prints (unit)
*1 1/2 x 7 1/2" strip pink and gray print (band)
*6" square floral pattern with pattern centered
*Purchased 6 1/2 x 9 1/2" wire spiral-bound notebook (available at office supply stores) I bought mine at Staples!
*Glue stick, and *Spray adhesive oh... one more thing *an 8 1/2 11" piece of scrapbook paper to match your notebook.
Cut fabrics as follows:
1. From Floral 7 1/2 x 6" rectangle, cut to 7 x 4" rectangle
2. From Striped piece, cut 7 x 5 1/2" rectangle
3. From scraps cut, 1 - 2 x 2 1/4" rectangle, and 2 - 2" squares
4 From pink and gray floral cut to 1 - 1 x 7" strip
5 From 6" square cut 1 - 4 3/4" square
Assemble as follows:
1. Pry open spiral binding and remove front cover from notebook.
2. Referring to the above picture adhere floral 7 x 4" piece and 7 x 5 1/2" striped piece to notebook cover, avoiding spiral-binding holes, to make applique foundation; adhere fabrics in place with glue stick. Trim excess fabric along notebook cover edge.
3. Join short edges of assorted print 2 x 2 1/4" rectangle and 2 " squares (using 1/4" seam). MAKE SURE THE 2 X 2 1/4" RECTANGLE IS IN THE MIDDLE... i made this mistake :(. Once sewn, press seams open. With right side up, fold under long edges of unit 1/4" and press.
4. Referring to above picture, position step 3 unit onto notebook. Adhere with glue stick. Top-stitch unit to notebook cover 1/8" from long edges. To stitch through the notebook cover it is suggested to use a heavy duty needle; although, I was able to use my normal weight needle.
5. Referring to above picture, position pink and gray fabric on applique foundation to cover raw edges; adhere as before. Zigzag-stitch print to foundation along long edges. Trim any excess.
6. Turn under edges of 4 3/4" square 1/4" and press. Position square on applique foundation, adhere as before, and top-stitch 1/8" from outer edges. Trim top and right-hand corners of square even with notebook cover edges.
7. Zigzag-stitch around outer edges of cover.
8. Apply a coat of spray adhesive to back of 6 1/4" x 9 1/2 " card-stock. Adhere card-stock to reverse side of cover to conceal stitching. Reassemble notebook, bending wires back into place to complete project.
Note that if you want to use a different size notebook, feel free to do so! I did and I had to adjust my fabric pieces just slightly. I would LOVE to have you come into the store and ask me any questions! Until next time...


No comments:
Post a Comment